
Firebase Authentication & NestJS API – Our Backend Gains Momentum 🚀
In the last part, we prepared your server together and created a small test app to make sure your setup works. Today, we’re taking the next big step: We’re building the foundation of your backend.
The goal of this article:
Your NestJS backend gets a proper structure
Users can log in via Firebase Authentication using an ID token
We connect the backend to a MySQL database (via Sequelize)
We create our first resource: ToDos (with CRUD endpoints)
Sounds like a lot? Don’t worry, we’ll go through everything step by step, so you’ll keep up even as a beginner. By the end of this article, you’ll already have a working backend that can authenticate your users and store ToDos. 🚀
🔑 Why Firebase Authentication?
Building security features yourself is error-prone and extremely time-consuming. Firebase offers you a mature solution that you can integrate into your NestJS backend with just a few lines of code.
You save development time
You benefit from Google’s security infrastructure
You have an easy way to register users with email/password or social logins
And Firebase Authentication is completely free as long as you don’t need phone number authentication
🗄️ Why MySQL?
While Firebase also offers its own database (Firestore), we’re deliberately using MySQL here. Why?
MySQL is relational → perfect for ToDos, which often map relationships like User → ToDos
You’ll learn how to integrate a classic SQL database with NestJS
You have full control on your VPS
This way, you combine the strengths of Firebase (Auth) with the flexibility of your own database (MySQL).
1. Setting up Firebase Authentication
Firebase Authentication takes care of all the complicated parts around login, password handling, and security for you. You don’t have to worry about hashing, session management, or complicated security – Firebase does it all for you.
Step 1: Create a Firebase Project
Create a new project → name it e.g.
ToDo AppIn the settings, enable Authentication → Sign-in Method and select Email/Password
👉 This will allow users to register easily with email & password later.
Step 2: Integrate Firebase Admin SDK in NestJS
Instead of building everything by hand, we use the ready-made package nestjs-firebase-auth. It already includes an Auth Guard that we can simply hook in. An Auth Guard is like a sentry that guards your API endpoints. To send a request to your endpoint, the client (website or mobile app) must first authenticate. It usually does this by sending an ID token in the header of the request. The Auth Guard then checks this token and decides whether the user is granted access.
npm install nestjs-firebase-auth firebase-adminIn your app.module.ts, we integrate the package:
import { Module } from '@nestjs/common';
import { FirebaseAdminModule } from '@alpha018/nestjs-firebase-auth';
import { ExtractJwt } from 'passport-jwt';
import { ConfigModule, ConfigService } from '@nestjs/config';

@Module({
  imports: [
    ConfigModule.forRoot({ isGlobal: true }),
    FirebaseAdminModule.forRootAsync({
      imports: [ConfigModule],
      useFactory: (configService: ConfigService) => ({
        base64: process.env.SERVICE_ACCOUNT_KEY,
        options: {}, // Optionally, provide Firebase configuration here
        auth: {
          config: {
            extractor: ExtractJwt.fromAuthHeaderAsBearerToken(), // Extract JWT from the header
            checkRevoked: true, // Optionally check if the token is revoked
            validateRole: true, // Enable role validation if needed
          },
        },
      }),
      inject: [ConfigService],
    }),
  ],
  controllers: [AppController],
  providers: [AppService],
})
export class AppModule {}
For the implementation of our Firebase Admin SDK, you need to log in with a service account. In this case, we do this with a base64-encoded string. You simply get the content of this string from your Firebase project under Project Settings → Service Accounts → Admin SDK → Generate New Private Key. By clicking the button, a JSON file is downloaded. You can then upload this file to base64encode.org under Encode. Afterwards, you should get a text file with the key. You can now copy this key and create a new file in your NestJS project directory called ".env". There, insert the following code and replace xxx with your generated key:
SERVICE_ACCOUNT_KEY=xxxFrom now on, you can easily secure any of your endpoints with the FirebaseGuard. I’ll explain how to do this at the end of the article, so stay tuned!
2. Integrating MySQL Database (with Sequelize)
We need a database to permanently store users’ ToDos. For this project, we use MySQL because it’s fast, reliable, and very common. Of course, you can use any other database management system for your own project.
Install MySQL on your server
First, we create a MySQL server on our VPS. It is then accessible via a specific port (usually 3306) and allows us to send and receive database queries with NestJS.
sudo apt update
sudo apt install mysql-server
Now your MySQL server is ready. Next, log into the server:
sudo mysqlNow you can enter SQL commands and create new tables and entries. But we don’t want to do this via the terminal, but through our NestJS backend. For access, we need a user for the MySQL server, with which we can log in from NestJS:
CREATE DATABASE todo_app;
CREATE USER 'todo_user'@'localhost' IDENTIFIED BY 'strongPassword123!';
GRANT ALL PRIVILEGES ON todo_app.* TO 'todo_user'@'localhost';
FLUSH PRIVILEGES;
Of course, you should choose the password and username yourself. With that, this step is done. We now have a working MySQL server on our VPS and can access it from NestJS!
Install Sequelize in NestJS
For access, we use Sequelize. This is a really handy package for communicating with a MySQL database. With Sequelize, we not only avoid tedious SQL commands, but can also dynamically adjust our database structure via NestJS. Go back to your NestJS project and enter the following command in the terminal:
npm install --save @nestjs/sequelize sequelize sequelize-typescript mysql2Create Database Module
First, we need to tell our app how to log in to our MySQL server. For this, we first extend our .env file:
SERVICE_ACCOUNT_KEY=xxx

MYSQL_HOST=[Your server IP address]
MYSQL_PASSWORD=[Your MySQL password]
MYSQL_USER=[Your MySQL username]
MYSQL_DATABASE=todo_app
Of course, enter the data that applies to you. Next, in our src folder, we create the file database.providers.ts. Fill it as follows:
import { Sequelize } from 'sequelize-typescript';
import { databaseDialect, databaseProvider } from './common/constants';

export const databaseProviders = [
  {
    provide: databaseProvider,
    useFactory: async () => {
      const sequelize = new Sequelize({
        dialect: databaseDialect,
        host: process.env.MYSQL_HOST,
        port: 3306,
        username: process.env.MYSQL_USER,
        password: process.env.MYSQL_PASSWORD,
        database: process.env.MYSQL_DATABASE,
      });
      sequelize.addModels([]);
      sequelize.sync({ alter: true })
        .then(() => {
          console.log('Database synchronized');
        })
        .catch((err) => {
          console.error('Error synchronizing database:', err);
        });
      return sequelize;
    },
  },
];
As you can see, we use the variables we previously set in our .env file, for example process.env.MYSQL_HOST. Finally, we create a Database Module in the file database.module.ts, which is also located in our src folder.
import { Module } from '@nestjs/common';
import { databaseProviders } from './database.providers';

@Module({
  providers: [...databaseProviders],
  exports: [...databaseProviders],
})
export class DatabaseModule {}
And with that, we’ve done it. NestJS can now access our database and nothing stands in the way of our first ToDos!
3. Create ToDo Resource
Now it gets exciting: We’re building the actual ToDo API. The goal is to implement several endpoints for creating, editing, deleting, and reading ToDos.
NestJS provides a handy generator for this:
nest g resource todosAfter confirming the command, you’ll be asked which transport layer you want to use. Select Rest API here. Then you’ll be asked if you want CRUD (Create Read Update Delete) endpoints. Just confirm with Enter.
After running the command, NestJS automatically creates several files and folders for us. Let’s first take a look at what structure has been created and which components were generated:
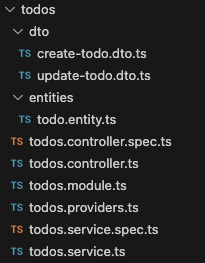
You’ll see that a Service, a Controller, and a Module have now been created. The Module is the “organizational unit” – here all parts belonging to the ToDos are bundled. The Controller is responsible for providing the various endpoints through which our app can later work with the ToDos. NestJS has already prepared CRUD endpoints (Create, Read, Update, Delete) for us. The actual logic, i.e., what should really happen in the background, ends up in the Service. We’ll later build the connection to our database there as well.
Additionally, two folders were created: entities and dtos.
In the entities folder, we define our data models – that is, the structure of how a ToDo object looks in the database. You can think of it as a blueprint: What properties should a ToDo have? Typically, a ToDo needs at least a title to know what needs to be done. Maybe also a due date, so it’s clear by when the task should be completed. We then record these properties in our entity as variables.
The DTOs (Data Transfer Objects) are also data models, but have a different purpose. They describe the data that a client (e.g., our app or website) sends to our server when creating or editing a ToDo. A DTO doesn’t necessarily have to contain all the properties of the entity, just those relevant for the respective request. The practical thing is: With DTOs, we can immediately ensure that the transmitted data makes sense. For example, we can check that the title of a ToDo is really a string and not empty. If this condition is not met, NestJS automatically returns a Bad Request Error – without us having to write many complicated IF-ELSE statements ourselves.
Create Model
Now it’s time to create our first model. Add the following content to the file todos/entities/todo.entity.ts:
import { Table, Column, Model, DataType } from 'sequelize-typescript';

@Table({
  tableName: 'todos',
})
export class Todo extends Model {
  @Column({
    type: DataType.TEXT,
    allowNull: false,
  })
  title: string;

  @Column({
    type: DataType.DATE,
    allowNull: false,
  })
  dueDate: Date;

  @Column({
    type: DataType.BOOLEAN,
    defaultValue: false,
  })
  completed: boolean;
}
Briefly to explain what we’re doing here. With @Table({ tableName: 'todos' }) we say that a table named todos should be created or used in the database.
The Todo class extends Model, which means it gets all the functions from Sequelize to later save, query, or delete data in the table.
Within the class, we define the columns:
title
Type: TEXT
Cannot be empty (allowNull: false)
This is the title of our ToDo, e.g., “Go shopping”.
dueDate
Type: DATE
Also cannot be empty (allowNull: false)
This field indicates by when a ToDo should be completed.
completed
Type: BOOLEAN (i.e., true/false)
Default value: false
This field indicates whether a ToDo is already done or not.
In short: With this file, we describe the todos table in the database and specify that each ToDo should have a title and a status (done or not). It’s important to know that Sequelize also automatically adds the fields id, createdAt, and updatedAt to our model. You’ll see this later in the database when you create your first ToDo.
Create DTO
As already mentioned, DTOs are a simple way to validate your requests. To do this, we first need to install class-validator:
npm i --save class-validator class-transformerThen we can fill our create-todo.dto.ts file as follows:
import { IsDate, IsNotEmpty, IsOptional, IsString } from "class-validator";

export class CreateTodoDto {
    @IsString()
    @IsNotEmpty()
    title: string;

    @IsDate()
    @IsNotEmpty()
    dueDate: Date;

    @IsOptional()
    completed?: boolean;
}
This shows our endpoint what body to expect. So, which values must a client provide so that the endpoint can do what it’s supposed to. In this case, we define this for our create endpoint, which we’ll use to create ToDos later. Class-validator offers countless ways to validate the values passed. Feel free to try out different settings. For our example, we’ll just use IsDate, IsNotEmpty, IsOptional, and IsString for now.
Create Provider
So that we can use our Todo model cleanly in the service later, we create our own provider. Providers in NestJS are a kind of “building blocks” that you can insert into other classes. This keeps the code modular, reusable, and clear.
To do this, we create a new file todos.providers.ts with the following content:
import { Todo } from './entities/todo.entity';

export const todosProviders = [
  {
    provide: todoProvider,
    useValue: Todo,
  },
];
As you’ll notice, we’re still missing the variable todoProvider. We create this in the file src/common/constants.ts. We can also store other provider keys there later. For our todoProvider, it looks like this:
export const todoProvider = 'TODO_REPOSITORY';Whenever we ask for TODO_REPOSITORY in our service, we automatically get our Todo model back.
In the next step, we need to make todosProviders known to the project. In the file todos.module.ts, we therefore need to add the following code:
import { DatabaseModule } from 'src/database.module';
import { Todo } from './models/todo.model';
import { todosProviders } from './todos.providers';

@Module({
  imports: [DatabaseModule],
  controllers: [TodosController],
  providers: [TodosService, ...todosProviders],
})
export class TodosModule {}
This way, our TodosModule now knows our database through the DatabaseModule and at the same time our todosProviders. We can now use these in the TodosService. To do this, we need to make the following adjustment in the service:
import { Inject, Injectable } from '@nestjs/common';
import { CreateTodoDto } from './dto/create-todo.dto';
import { UpdateTodoDto } from './dto/update-todo.dto';
import { Todo } from './entities/todo.entity';

@Injectable()
export class TodosService {

  constructor(
    @Inject(todoProvider)
    private todosRepository: typeof Todo,
  ) {}
...
But why do we do it this way? We cleanly separate responsibilities (Separation of Concerns), our services become more testable and flexible, and we use the strength of NestJS: Dependency Injection. This means we can insert building blocks like our Todo model wherever we need them.
Fill the Service
Currently, our endpoints don’t do much. If we were to call our Todo endpoints with Postman, for example, we’d just get different strings returned. We want to change that in this step.
Each of our CRUD endpoints needs direct communication with the database. Let’s start with creating a ToDo. For this, we adjust the create function in our service as follows:
create(createTodoDto: CreateTodoDto) {
  return this.todosRepository.create<Todo>({ ...createTodoDto });
}
In our todos.service.ts, we have the create function, which ensures that a new ToDo is saved in our database. The function receives our createTodoDto.
We access our database via this.todosRepository. We previously included this repository as a provider so we can use it here in the service. With the command .create<Todo>(), we then create a new ToDo in the database. The <Todo> is a hint for TypeScript that the result of this operation is a ToDo object.
The interesting part is the expression { ...createTodoDto }. The three dots are the so-called spread operator. It ensures that all properties in createTodoDto are directly transferred to our new object. So if, for example, the client sends the data { "title": "Go shopping", "completed": false }, exactly this object is passed on to our database.
At the end, we return the result of this operation. This means that as soon as the new ToDo is successfully saved, the client gets the freshly created ToDo object back – usually as JSON.
Similarly, we now fill the other functions of our service:
findAll() {
    return this.todosRepository.findAll<Todo>();
  }

  findOne(id: number) {
    return this.todosRepository.findOne<Todo>({ where: { id } });
  }

  update(id: number, updateTodoDto: UpdateTodoDto) {
    return this.todosRepository.update<Todo>({ ...updateTodoDto }, { where: { id } });
  }

  remove(id: number) {
    return this.todosRepository.destroy({ where: { id } });
  }
You see that a similar structure is used here. The only difference is the WHERE queries. These simply ensure that only the entry with the passed ID is returned. The ID is the primary key of our ToDos. This means that each ToDo can be uniquely identified by its ID. So it’s perfect for searching for individual ToDos.
And with that, we’ve already done it! We can now run the NestJS app with the command
npm run start:dev
and find our endpoints at http://localhost:3000/todos. I recommend using Postman for testing. There you can call your endpoints with different request types.
If you’ve already followed the first part of this series, you can also use pm2 again to get your app running. Just use the following command:
pm2 restart todo-api4. Secure Endpoints with Firebase
There are two ways to use the Firebase Guard to secure your endpoints. If you only want to add authentication to individual endpoints, you can simply write @UseGuards(FirebaseGuard) above the respective endpoint in your todos.controller.ts:
@UseGuards(FirebaseGuard)
@Post()
create(@Body() createTodoDto: CreateTodoDto) {
  return this.todosService.create(createTodoDto);
}
If you want to protect all endpoints in a module, you can simply write this line above your controller:
@UseGuards(FirebaseGuard)
@Controller('todos')
export class TodosController {
  constructor(private readonly todosService: TodosService) {}

  @Post()
  create(@Body() createTodoDto: CreateTodoDto) {
    return this.todosService.create(createTodoDto);
}
This way, only logged-in users can access your endpoints. For testing with Postman, you can either remove this line or first get your Bearer token via Postman, which you can add to the header of your requests. You get it as follows:
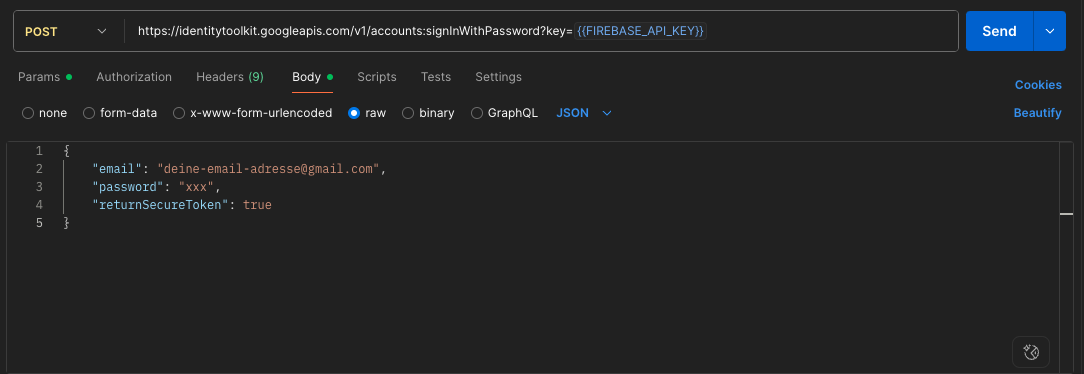
You’ll find the Firebase API key in the project settings of your Firebase project under Web API Key. The request should return an ID token, which you can use for requests to your NestJS app.
Conclusion
In this article, you’ve accomplished a lot:
✅ Integrated Firebase Authentication for secure logins
✅ Configured MySQL with Sequelize
✅ Created the first resource (ToDos) with the NestJS generator
✅ Started the API reliably with pm2
Now you have the foundation of your backend: Users can register, log in, and save their own ToDos.
In the next article, we’ll look at how to cleverly connect the API with our Flutter app, so your users can soon manage their ToDos directly on their smartphones 📱.
Comments
Please sign in to leave a comment.